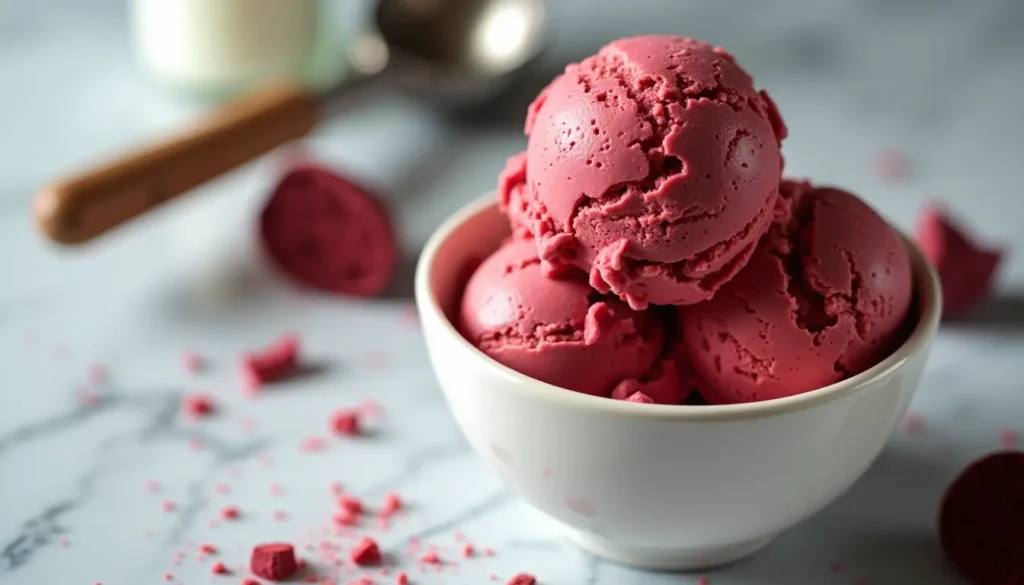
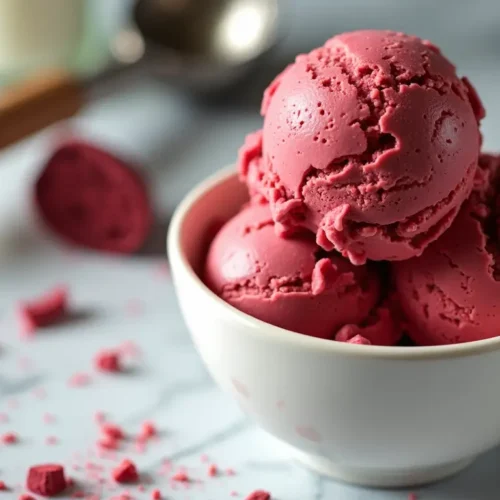
easy Red Velvet Ice Cream
Traditional red velvet ice cream takes 3 hours to prepare, but we’ve found a cool no-churn version you can whip up in just 10-15 minutes!
This rich dessert captures the classic red velvet flavor by mixing buttermilk and cocoa powder with cream cheese. The recipe makes a great Valentine’s Day treat and gives you creamy goodness in every spoonful.
A few basic ingredients work wonders – heavy cream whole milk, and cocoa powder make 8-10 servings of this tasty dessert. Your creation can stay good in the freezer for up to a month, though it sticks around that long!
Now let’s dive into this easy recipe that turns the popular red velvet flavor into your favorite frozen snack.
Before You Get Started:
Let’s prepare to create this tasty red velvet ice cream. Your cream cheese should reach room temperature first – this ensures smooth blending and stops lumps in your final treat.
The mixing bowl and beaters need about 15 minutes in the freezer. This easy step results in the ideal whipped cream texture and makes your ice cream extra light and creamy.
Your ingredients should be measured and set on the counter in order of use. While room temperature ingredients mix better, the heavy cream and milk must stay cold until needed.
You need to make room in your freezer for the ice cream container. An airtight container that’s safe for the freezer stops ice crystals from forming. Metal loaf pans do the job well, and a plastic container with a lid that fits works great too.
Remember, you’ll need plenty of red food coloring to get that classic red velvet color. Different brands and types need different amounts, so it’s a good idea to have extra.
Key Tips:
Top-notch ingredients are essential to make tasty red velvet ice cream. Milk and cream with high fat content will give you a smooth creamy texture.
Make sure your ingredients and equipment are cold before you start. Put your mixing bowl in the freezer beforehand to help the ice cream freeze quicker. Using room temperature cream cheese results in the smoothest texture possible.
These methods will ensure perfect outcomes:
- Beat heavy cream until it forms stiff peaks, but don’t overdo it
- mix in red velvet cake crumbs to keep their texture intact
- Scrape the sides while churning for even freezing
- Add food coloring bit by bit until you get the color you want
Keep any add-ins no bigger than a blueberry to maintain consistency. You can choose to keep or remove the frosting from the cake depending on what you prefer.
Your ice cream’s final texture depends on your preference. Churning results in a soft-serve consistency you can eat . To make it harder, freeze it for up to 6 hours. To scoop more , let the ice cream warm up a bit at room temperature.
Sugar plays a key role in creating that smooth creamy texture, not just in adding sweetness. Keep your ice cream in an airtight container if you plan to store it for a while.
What Makes This Recipe So Good?
This red velvet ice cream tastes amazing because of its well-balanced flavors. The buttermilk-cocoa base works great with cream cheese to create a unique flavor that captures the essence of classic red velvet cake.
This frozen dessert, like its cake counterpart, offers a gentle chocolate taste rather than an intense cocoa flavor. Its smooth silky texture provides a rich creaminess with a light fluffy consistency that dissolves in your mouth.
The key cream cheese element combines with a pleasing blend of vanilla and almond extracts. Each bite brings that distinct tanginess we enjoy in classic red velvet desserts making it an ideal homage to the popular treat.
You won’t have to struggle with ice-hard ice cream because it remains softer and easier to scoop even after freezing. It maintains its form when served. The deep red color adds an artistic flair as pink spirals form in your bowl with every spoonful.
This recipe has an impact on its storage options. The ice cream keeps its quality for up to two weeks but can last four months. Its creamy texture stays the same throughout giving you that perfect mix of firmness and ease of scooping that makes homemade ice cream unique.
Why I Love This Recipe:
This red velvet ice cream recipe stands out because it’s flexible and safe for people with allergies. The recipe suits people with different diet needs and doesn’t contain gluten, nuts, or eggs. You can change it to make it dairy-free and vegan without losing its key flavor.
Every spoonful has an influence on pure enjoyment with its velvety feel. The mix of chilled cream cheese and whipped ingredients produces a smooth texture unlike any other. The recipe’s unique quality stems from cream cheese’s distinct tang that captures the real red velvet experience.
To create this intricate dessert is easy. The prep lasts just 10 minutes, excluding freezing time, which makes it ideal to plan events or satisfy sudden urges. You don’t even need an ice cream maker to whip it up.
The recipe’s buttermilk tang gives the impression of cream cheese frosting hidden inside. This one-of-a-kind flavor elevates the dessert above a simple frozen treat. It seems like eating a piece of red velvet cake that’s been transformed into a silky, cool, and gratifying frozen delight.
Storing this ice cream helps it maintain its tasty qualities letting you savor this smooth treat for longer.
Recipe Variations
This red velvet ice cream recipe gives you tons of fun ways to make it your own. You can whip up a vegan version that’s just as yummy by using plant-based swaps – oat milk instead of whole milk, vegan cream cheese works great, and cream of coconut takes the place of heavy cream.
The original recipe tastes fantastic, but these add-ins can kick your ice cream’s flavor up a notch:
- Chopped nuts to add some crunch
- Dried fruits for natural sweetness
- Chocolate sandwich cookies to mix up the texture
- Red velvet cake crumbs to make it authentic
Gel food coloring has an exceptional impact on creating that signature red velvet hue. A boxed cake mix is great to use for the red velvet parts because its oil and sugar content helps to make a more freezer-friendly texture.
The cream cheese base allows you to try different flavors. A light touch of citrus zest goes well with the rich chocolate notes. We mixed simple dairy ingredients without cooking egg yolks to create the base recipe.
Leftover red velvet cake or cupcakes make this dessert special – you can even keep the cream cheese frosting as is. The ice cream stays good for up to one week when you store it in the freezer.
Equipment
To make tasty red velvet ice cream, you’ll need the right equipment. A stand mixer with whisk attachment or an electric hand mixer will give your ice cream the ideal consistency.
You’ll need these basic tools:
- Large mixing bowl
- Measuring cups and spoons
- Silicone whisk for gentle mixing
- Fine-mesh strainer to ensure smoothness
An ice cream maker will speed up freezing. The Cuisinart ice cream maker makes desserts in just 20 minutes. If you already have a stand mixer, the KitchenAid ice cream maker attachment works well too.
Good storage plays a key role in keeping your ice cream fresh. SUMO ice cream containers stack and help you scoop more . They guard against freezer burn and keep the ice cream fresh.
The success of your homemade ice cream depends on freezing it right. You need to freeze the ice cream maker’s bowl for at least 24 hours before you use it. Using a cold shallow container or loaf pan helps you get the best texture in the last freezing step.
A good ice cream scoop will make serving more fun. The Midnight Scoop created by an aerospace engineer, will give you perfect scoops every time. This tool makes your red velvet ice cream look great and serve well.
Red Velvet Ice Cream
Ingredients
- This red velvet ice cream recipe has an influence on two main parts – the ice cream base and a cream cheese swirl. The ice cream base begins with 2 cups heavy cream and 1 cup whole milk. These dairy items create the base to make our ice cream creamy.
- We mix in 3/4 cup granulated sugar to balance the flavors and help the ice cream freeze right. The recipe needs 2 tablespoons cocoa powder to add that hint of chocolate that makes red velvet treats unique.
- The classic red velvet color comes from 1 tablespoon liquid red food coloring. You’ll also need 1 teaspoon vanilla extract and 1/4 teaspoon kosher salt to boost the overall taste.
- Your cream cheese swirl requires 4 ounces of cream cheese at room temperature 1 cup of powdered sugar, and 1 teaspoon of vanilla extract. You’ll also need 2 cups of red velvet cake pieces – you can chop up homemade or store-bought cake into small even pieces.
- Quality Tip: Heavy cream and whole milk together create the creamiest texture. The butterfat in these ingredients gives your ice cream a smooth consistency even after it freezes.
- Remember, the cream cheese should be at room temperature when you start. This step helps you avoid lumps and ensures a smooth swirl throughout the ice cream.
Instructions
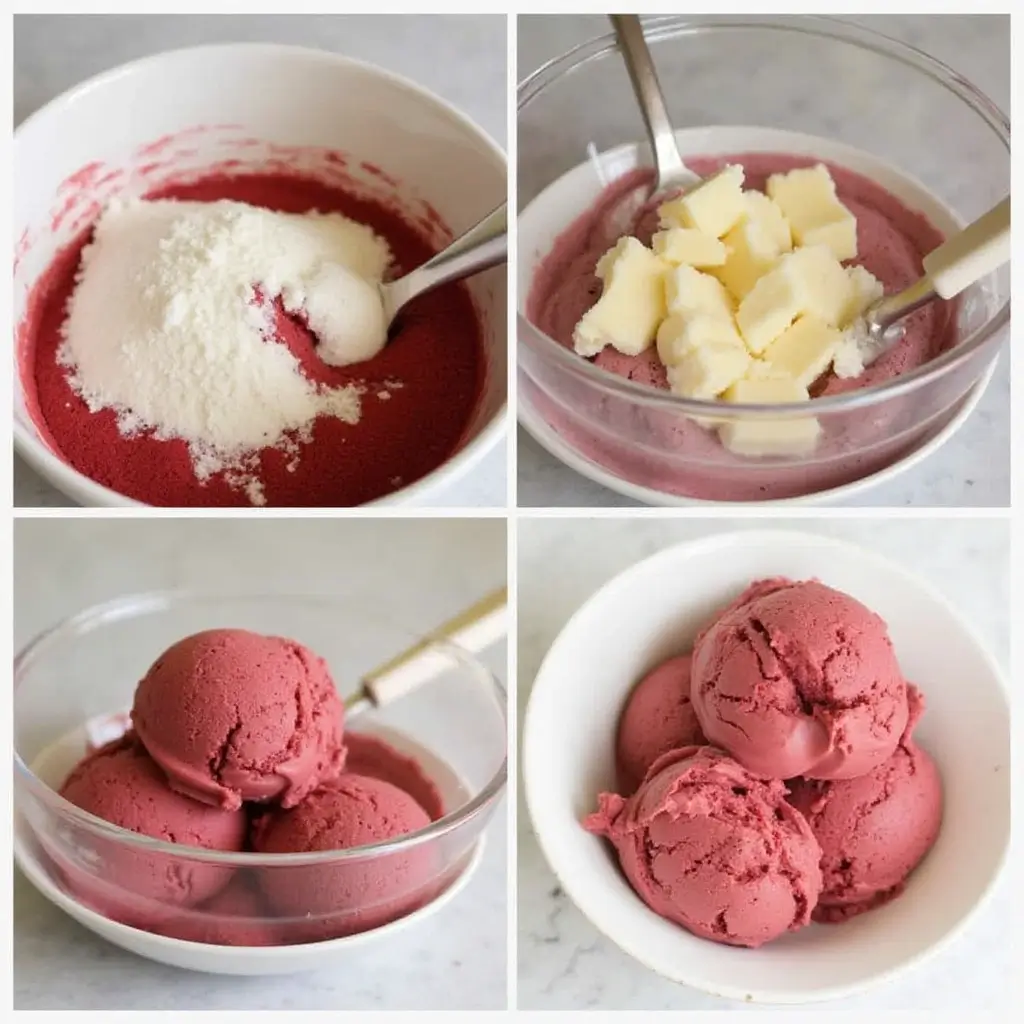
- Begin your red velvet ice cream by combining cream cheese, sweetened condensed milk, and vanilla in a big bowl. Mix these components until they form a smooth blend.
Preparation:
- Put the cream cheese mixture in a powerful blender with heavy cream, milk, sugar, and cocoa powder. Blend until it becomes smooth.
- Transfer the mixture to a large bowl and chill it for 2-3 hours or leave it overnight.
- Once chilled, create your cream cheese frosting. Beat cream cheese, butter, and vanilla together. add powdered sugar until the mixture turns fluffy.
Cooking:
- The ice cream maker churns the cold mixture. Follow the maker’s guidelines, which need 30-45 minutes. Scrape the sides with a metal spoon or rubber spatula while churning to freeze .
- Build your ice cream in these steps:
- Put one-third of the churned ice cream in a freezer-safe container
- Add cream cheese frosting in small amounts on top
- Make light swirls with a knife
- Do this two more times
- Cover the container with plastic wrap. Allow the ice cream to harden in the freezer for about 6-8 hours. You can keep this ice cream in the freezer for up to a month without losing quality.
- Temperature Tip: To get a silky smooth texture, heat the mixture to 170°F. You’ll know it’s done when a line drawn with your finger on the back of a spoon stays put.
Notes
- Combine 3/4 cup milk with 3/4 cup plain yogurt or sour cream to replace buttermilk
- Natural cocoa powder results in a lighter red hue compared to Dutch-processed cocoa
- Natural food colorings serve as good substitutes for artificial dyes


