Kunafa Recipe
My grandmother’s traditional kunafa recipe has its roots in Nablus, Palestine, where this magnificent Middle Eastern dessert originated centuries ago. This iconic sweet holds a cherished place in Arabic culture and becomes the centerpiece of festive tables during Ramadan celebrations.
Kunafa’s remarkable versatility shines through its perfect harmony of crispy pastry, sweet cheese, and aromatic sugar syrup. Many restaurants serve their interpretations of this beloved dessert, yet our family’s recipe remains distinctive through its use of authentic ingredients like traditional Kataifi dough and carefully selected Nabulsi cheese.
We strictly adhere to using ghee instead of butter to preserve the authentic taste that commercial versions often lack. This time-tested recipe will deliver genuine Middle Eastern household flavors, whether you’re familiar with kunafa or just finding it now.
Before You Get Starte:
Let me share some tips that will make a huge difference in creating the perfect kunafa. Temperature control is a vital part of getting the right texture. You should take all ingredients out of the refrigerator at least 30 minutes before you start.
Key Tips:
- Temperature Management: The right temperature will give you evenly melted cheese and that signature crispy pastry. Room temperature ingredients will also blend better together.
- Preparation Timing: Start by making the sugar syrup and let it cool completely. This step keeps your kunafa crisp instead of turning soggy when hot syrup meets warm pastry.
- Dough Handling: Handle the Kataifi dough with care to keep it intact. Separate the strands gently and keep them under a damp cloth so they don’t dry out.
- Pan Selection: The right pan size leads to even cooking. A 14-inch round pan with slightly raised edges works best to get perfect thickness and crispy edges.
- Ghee Application: Brush the ghee generously but evenly to create that beautiful golden-brown crust. This step adds rich flavor and prevents the dough from sticking.
These steps might seem detailed, but they are the foundations of making amazing kunafa. This approach helps you create restaurant-quality results with homemade charm.
What Makes This Recipe So Good?
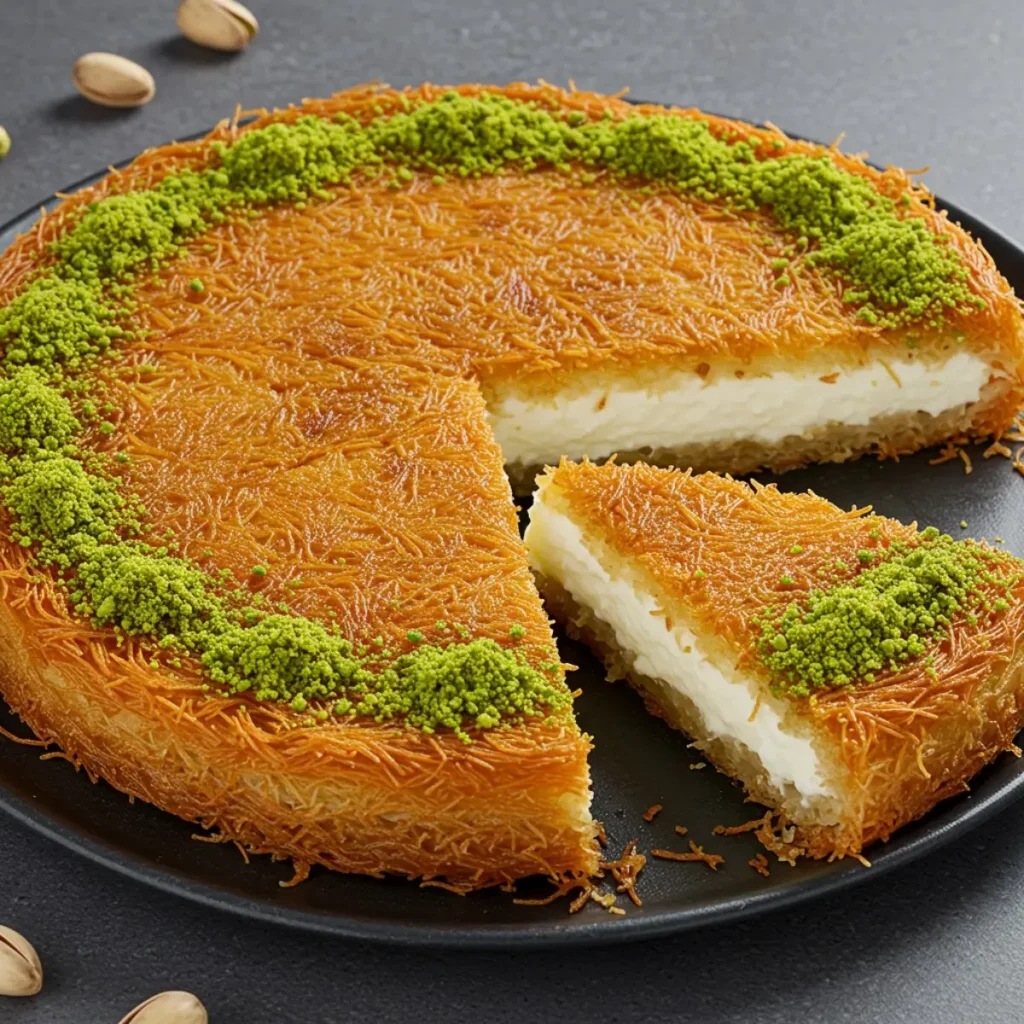
Making authentic kunafa depends on getting the right balance between textures and flavors. The magic happens when you combine a crunchy exterior with a molten interior, which creates an irresistible contrast. This dessert’s unique character comes from its layers – crispy shredded phyllo pastry that wraps around a rich, gooey center.
The quality of ingredients is a vital part of making perfect kunafa. You’ll need kataifi – shredded phyllo pastry broken into shorter strands, along with real ghee to get that superior flavor. The dessert’s signature orange-red color comes from special kunafa food coloring.
This beloved dessert shines through its diverse filling options. Nabulsi or Akkawi cheese are the foundations of traditional kunafa, but new variations have emerged across the Middle East. These traditional cheeses can be hard to find, so some regions now use mozzarella because it melts in a similar way.
Kunafa tastes best when served warm – that’s when you can really appreciate the molten filling. The sugar syrup, often infused with rose water or orange blossom water, brings an extra touch of elegance. Chopped pistachios on top add both visual appeal and a pleasant crunch.
Why I Love This Recipe:
This kunafa recipe means more to me than just a list of ingredients and steps. My grandmother used to make this dessert in her stone oven. She created golden memories that still shine bright in my mind. The recipe connects me to my culture and heritage across generations.
The recipe stands out because it keeps the authentic flavors that newer versions often miss. It takes almost 8 hours to prepare it the traditional way, but the results are far better than anything you can buy in stores. The slow, careful process makes each bite special and turns it into something more than just another dessert.
The recipe’s value goes beyond its amazing taste. My cooking experience has taught me that keeping these food traditions helps us stay connected to our roots. The mix of textures creates pure magic – a crispy baked outer shell, soft cheese filling, sweet syrup, and crushed pistachios. Store-bought versions rarely match this perfect blend of flavors.
Life moves faster now and easier options are everywhere, but this recipe shows why we need to protect our food heritage. Making kunafa becomes more than just cooking – it’s a meaningful experience. That first bite always takes me to a place of pure joy. I can’t help but wonder “Where have you been all my life?” This recipe isn’t just about making a dessert. It’s about keeping alive a legacy that brings generations together through food.
Recipe Variations
Learning about kunafa shows many creative interpretations of this beloved dessert. Two traditional variations stand out – Knafeh Nabulseyeh from Palestine, which contains the city’s signature white, salty nabulsi cheese, and Knafeh Ghazawiya from Gaza, which features regional nuts and spices.
Each region has its own unique take on this versatile dessert. Turkish künefe uses a distinctive mozzarella-like Hatay cheese. Lebanese knefeh-bi-jibn blends mozzarella with orange-blossom-infused semolina. Jordanian kanafa creates its distinct flavor by combining mozzarella and ricotta.
Modern variations have broadened kunafa’s appeal significantly. Mango Kunafa adds a fruity twist in both parfait and traditional styles. Birds Nest Kunafa takes an artistic approach by rolling kataifi into nest-like shapes. Kunafa Cups have become a summer favorite by pairing the classic dessert with Booza ice cream.
New interpretations keep emerging:
- Sweet Variations: Red Velvet, Chocolate, Lotus, and KitKat Kunafa
- Savory Options: Chicken Rolls, Shrimp with tahini dressing, and Creamy Egg Kunafa
The dessert’s flexibility extends to its ingredients. Chefs can substitute clarified butter with vegan alternatives, and honey works well instead of traditional sugar syrup. These changes make kunafa available to more people while keeping its beloved characteristics intact.
Equipment
The right equipment will make a huge difference when you want to create perfect kunafa. We used a specialized kunafa pan with perforations that gives even baking and creates that signature crispy texture. People used metal plates made just for kunafa on stovetops in the past, but now you can bake it in the oven too.
A 9-inch cake pan or kunafa pan works great at home. You could also use a 9×13-inch rectangular pan, but keep the kunafa layer under 1-inch thick so the syrup soaks in properly. A muffin tray might be your best bet if you’re just starting out – it lets you make smaller portions and gives you better control.
Here’s what you’ll need:
- A sharp food processor or knife to shred
- A good whisk to mix
- Heat-resistant spoons to handle hot ingredients
- Measuring cups and spoons to get portions right
- Two mixing bowls to keep components separate
- A serving tray that matches your pan’s size
A baklava cutter is a great way to get clean, precise cuts through those delicate layers. This special tool won’t crush or tear the delicate phyllo dough. I still love using my traditional mortar and pestle, especially when I need to grind nuts to the perfect consistency for garnishing
Print
Kunafa Recipe
- Total Time: 1 hour 5 minutes
- Yield: 4 1x
Description
Make delicious Kunafa at home with this easy recipe—crispy dough, melted cheese, and sweet syrup!
Ingredients
The perfect kunafa comes together with premium ingredients that make up its three distinct parts. The base just needs Kataifi dough (shredded phyllo pastry) – about 1 pound to create that signature crispy texture. This delicate pastry works best with ¾ cup of ghee or clarified butter to get that golden-brown finish.
The filling combines traditional and available options. The authentic recipe uses Akkawi cheese, which we used in Middle Eastern cooking. But fresh mozzarella (1 pound) makes an excellent alternative. Adding ½ cup ricotta cheese improves the creaminess.
The syrup just needs exact measurements. Mix 1½ cups sugar with 1½ cups water. A teaspoon of lemon juice prevents crystallization. Rose water or orange blossom water adds that distinctive Middle Eastern flavor.
Here’s my complete ingredient list:
- For the Base:
- 1 pound Kataifi dough
- ¾ cup ghee
- 1 teaspoon kunafa food coloring (optional)
- For the Filling:
- 1 pound fresh mozzarella
- ½ cup ricotta cheese
- 2 tablespoons cornstarch
- 1 cup whole milk
- For the Syrup:
- 1½ cups granulated sugar
- 1½ cups water
- 1 teaspoon lemon juice
- 1 teaspoon rose water
- ¼ cup pistachios (for garnish)
Instructions
Step 1: Prepare the Syrup
- In a small saucepan, combine the water and sugar.
- Heat the mixture over medium heat, stirring occasionally until the sugar dissolves.
- Bring it to a gentle boil and let it simmer for 10-15 minutes, or until it slightly thickens.
- Add the lemon juice and rose or orange blossom water (optional). Stir and remove from heat. Set aside to cool.
Step 2: Prepare the Kunafa Dough
- Preheat your oven to 350°F (175°C).
- If using kunafa dough, gently pull it apart with your fingers to separate the strands. If using semolina, mix it with some butter to create a soft dough-like consistency.
- In a large bowl, combine the shredded kunafa dough (or semolina) with melted butter. If you want a sweeter dough, add sugar here and mix until fully combined.
Step 3: Assemble the Kunafa
- Grease a round or rectangular baking pan with some butter or ghee.
- Take half of the prepared dough mixture and press it into the bottom of the pan to form an even layer.
- Spread the cheese (or mixture of cheeses) evenly over the dough layer.
- Top with the remaining dough, pressing it gently to form a smooth layer.
Step 4: Bake the Kunafa
- Place the pan in the preheated oven and bake for 30-40 minutes, or until the kunafa turns golden and crispy on top.
- Keep an eye on it to avoid burning.
Step 5: Add the Syrup
- Once the kunafa is out of the oven, immediately pour the cooled sugar syrup evenly over the hot dessert. The syrup should soak in nicely.
- Let the kunafa sit for about 10 minutes for the syrup to absorb and cool down slightly.
Step 6: Garnish and Serve
- Garnish the kunafa with crushed pistachios or ground cinnamon for extra flavor and decoration.
- Slice and serve warm. It pairs wonderfully with a cup of Arabic coffee or tea!
- Prep Time: 25 minutes
- Cook Time: 40 minutes


