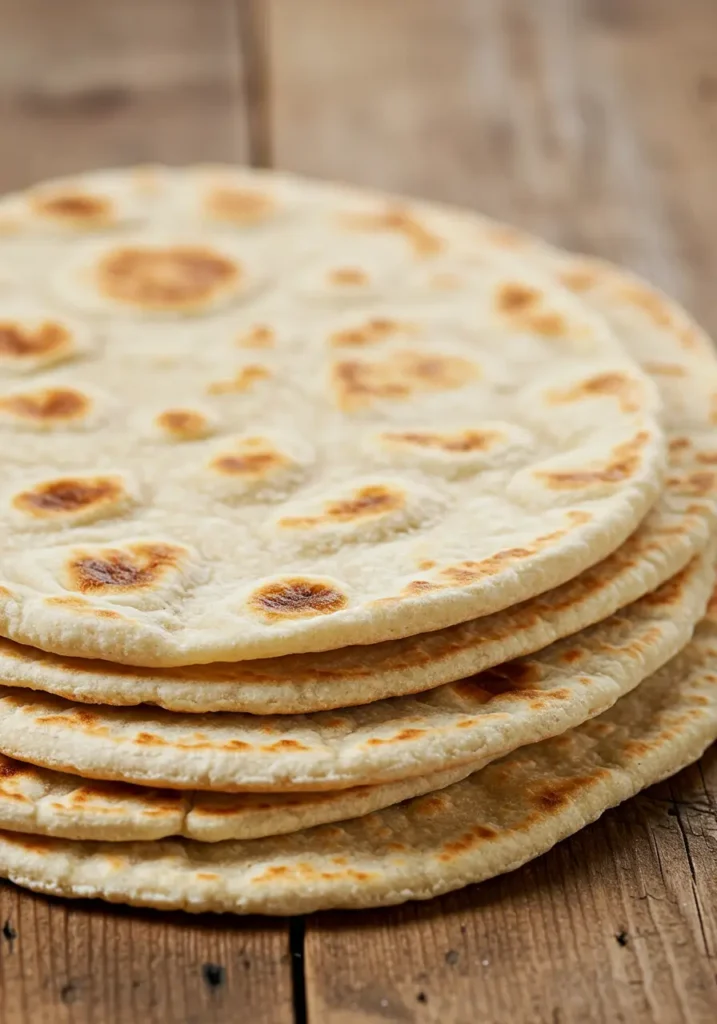
Homemade Gyro Bread
This Homemade Gyro Bread needs just 10 minutes to prepare, and it’s one of the easiest breads that ever spread across my kitchen counter. My family loves this thinner version of traditional pita bread, and it creates perfect wraps and sandwiches right at home.
Making gyro bread from scratch beats store-bought versions with their preservatives, and with good reason too. The recipe uses basic pantry ingredients you probably have right now. The bread’s special quality comes from its unique thickness – deliberately thinner than regular pita to wrap fillings perfectly. On top of that, it makes 6 fresh flatbreads that keep well for 2 days at room temperature or 3-4 days in your fridge.
Before You Get Starte:
The best results come from good preparation when making gyro bread. I always get my ingredients and equipment ready first – it makes everything run smoother.
Key Tips:
The dough temperature is a vital part of the preparation. I make sure my ingredients stay at room temperature, especially when you have water, because cold ingredients can mess with how the yeast works.
More importantly, weighing ingredients works better than using volume measurements for consistent results. I’ve learned to use the spoon-and-level method with flour to stop it from getting packed down.
These tricks have helped me make perfect gyro bread every time:
- Give the dough enough time to rest between steps
- Keep a light coating of flour on your work surface
- Make sure the dough thickness stays even
- Get your cooking surface really hot before you start
The dough consistency is what I focus on most. You want it smooth and elastic without being sticky. A bit of extra flour while kneading will fix any stickiness issues.
Your cooking surface needs to be hot enough before you begin. This will give a nice even bake and create those beautiful brown spots all over the bread.
What Makes This Recipe So Good?
This Greek flatbread really stands out because it’s so versatile and nutritious. It doesn’t have a pocket like traditional pitas. The bread’s thickness is like naan, which makes it perfect to use in many different dishes.
The bread’s health benefits make it a great choice. You’ll find important vitamins and minerals in every bite, including iron, calcium, and potassium. The high fiber content helps you digest better and manage your weight. Yes, it is true that whole wheat ingredients keep blood sugar levels steady.
You can use this gyro bread in so many ways:
- Making wraps and sandwiches
- Serving it with kebabs and appetizers
- Using it with dips like hummus and tzatziki
- Creating quick pizzas
The bread’s storage options make it practical. It stays fresh for 2 days when you keep it in an airtight container in the fridge. You can also freeze it for up to 3 months. This means you can make bigger batches and have fresh bread ready whenever you want.
The bread’s texture beats store-bought versions by a lot. It stays soft and flexible even when cold, so you can roll and fold it without any breaks. The cooking method adds great flavor, which creates a tender, chewy texture that works perfectly with any filling you choose.
Why I Love This Recipe:
Making gyro bread at home brings me joy because it needs just 4 simple ingredients. The fresh aroma fills my kitchen when these flatbreads cook on the stovetop and creates an irresistible atmosphere.
My experiments with different flour types showed that strong white flour gives the best texture. The stovetop cooking method is simple but creates beautiful golden-brown bubbles and appealing char marks that improve both looks and taste.
This recipe’s storage flexibility makes it even better. These breads stay fresh in an airtight container in the fridge for 2 days. You can freeze them for up to 3 months, which makes advance meal planning easier.
These flatbreads amaze me with their versatility. I make extra batches to use throughout the week. They work great with kebabs, scoop up hummus perfectly, and transform into quick pizzas, which makes meal planning a breeze.
Notwithstanding that, the recipe’s health benefits set it apart. The bread provides protein and important nutrients while staying naturally dairy-free and vegan. These nutritional perks and cooking flexibility make it an essential part of my weekly meal prep routine.
Recipe Variations
Learning about different variations of this classic recipe creates endless possibilities to customize it. The bread gets a nutty flavor when I mix equal parts all-purpose and whole wheat flour, and it stays just as flexible.
A stand mixer with a dough hook on low speed makes the dough preparation much easier. You can also make the dough ahead of time and keep it in the fridge before the first rest.
Greek seasoning in the dough improves the flavors. This versatile bread works great with many filling combinations:
- Classic falafel with hummus and fresh vegetables
- Grilled vegetables with vegan feta
- BBQ jackfruit with coleslaw
The bread’s storage options make it really practical. It stays fresh for 2 days on the counter or 3-4 days in the fridge. I separate the cooled flatbreads with parchment paper and freeze them to prevent sticking when I need to store them longer.
The recipe adapts easily to dietary needs. Unsweetened almond milk works just as well as dairy milk. Gluten-free versions need special attention though – they require specific flour blends and might need xanthan gum for the right texture.
You can adjust the bread’s thickness based on what you like. Thinner dough makes wraps that fold easily, while thicker dough creates hearty Mediterranean-style flatbread.
Equipment
Making perfect gyro bread in my kitchen requires a mix of simple tools and specialized equipment. We used a large mixing bowl and a wooden spoon or dough scraper as the foundations of my preparation setup.
A stand mixer with a dough hook attachment gives the best results. Hand kneading works well if you don’t have a stand mixer. You’ll need a rolling pin to get that uniform thickness in the flatbreads.
Here’s the equipment I can’t do without:
- A cast iron skillet to cook on the stovetop
- Parchment-lined baking sheets to prepare everything
- A food scale to portion accurately
- Proofing bags to develop the dough
Professional bakeries employ specialized equipment that can make 1,200 to 7,200 units every hour. Their industrial setups come with automatic dough dividers, rolling machines, and tunnel ovens that use electric or gas heating.
Home bakers can make excellent gyro bread with simple kitchen tools, even though commercial production uses sophisticated machinery. A properly heated cooking surface is a vital part of the process, and that’s why my cast iron skillet works so well – it retains and distributes heat perfectly.
You can use a baking stone instead of the skillet if you prefer oven-based cooking. This flexibility lets you adapt based on your kitchen tools and still create authentic-tasting gyro bread with the right texture.
Ingredients
Quality ingredients make authentic gyro bread special. All-purpose flour or bread flour creates the base, and both options give excellent results. The yeast’s quality determines the bread’s texture – I prefer instant yeast because it skips the activation step.
My recipe needs these exact measurements:
- 3 cups all-purpose flour
- 1½ teaspoons active dry yeast
- 1½ teaspoons salt
- 1½ teaspoons sugar
- 1½ cups warm water
- 2 tablespoons olive oil
Ingredient temperature plays a vital role. Lukewarm water activates the yeast and helps it work better. Extra virgin olive oil makes the bread tender and creates a moisture barrier.
Kosher salt stands out as an excellent choice for this recipe. Its fine grain size makes measuring accurate and spreads evenly in the dough. The salt and sugar combination controls yeast fermentation and helps the bread brown properly.
You can try whole wheat variations by replacing some all-purpose flour. But start small – about ¼ cup of whole wheat flour – to keep the right texture.
Instructions
The process starts with lukewarm water at 105°F (41°C). I mix it with yeast and sugar in a small bowl. The mixture needs to rest for 10-15 minutes until foam appears.
A large bowl works best to mix flour and salt. I add the yeast mixture and olive oil, then knead the dough for 8-10 minutes until it becomes smooth and elastic. The dough’s texture should feel tacky but manageable, and extra flour isn’t needed unless absolutely necessary.
The dough goes into a clean bowl to rise for 1-2 hours until it doubles in size. Once doubled, I divide it into 6-8 equal portions and shape them into balls.
These dough balls need a 30-minute rest. Each piece then gets rolled into a thin circle, about 7 inches (18cm) in diameter. Traditional Greek-style gyro bread requires fork pricks on the surface to prevent pockets from forming.
My stovetop method uses a cast iron skillet over medium-high heat. The bread cooks for 3-4 minutes on the first side until golden brown, and another minute on the second side. Bubbles will form, and that’s when I drizzle olive oil and flip every 30 seconds until deeply golden.
The oven method needs a 480°F (250°C) preheated pizza stone or baking tray. The bread bakes for 3-4 minutes and needs careful watching to prevent burning. Fresh from the heat, these breads get wrapped in a clean kitchen towel right away to stay soft.
Notes
My homemade gyro bread stays fresh with the right storage techniques. A ziplock bag at room temperature keeps leftover pieces good for up to 4 days. The flatbreads can last up to 3 months in the refrigerator if you place wax paper between each piece.
These proven methods work best to reheat the bread:
- Microwave: Wrap in damp paper towel, heat 10-20 seconds
- Air Fryer: Wrap in foil, heat at 380°F for 3-5 minutes
- Steam Skillet: Add water drops, cover and heat 10-15 seconds
- Open Flame: Hold briefly over gas flame to get a smoky flavor
The warm bread needs to sit in a plastic bag for one minute after reheating to spread moisture evenly. The dough’s consistency plays a crucial role – it should feel slightly tacky, not dry.
We measured ingredients by weight instead of volume to get consistent results. The dough’s hydration level needs careful monitoring since it affects the bread’s texture and puffing ability. The bread ended up too thick in my first attempts, so I adjusted my rolling technique to make thinner, more pliable pieces.
Extra batches freeze exceptionally well to prepare ahead. Parchment paper between pieces prevents them from sticking together in the freezer. This approach keeps the bread fresh for up to three months.
Print
Gyro Bread Recipe
- Total Time: 30 minutes
- Yield: 6 1x
Description
This homemade gyro bread is soft, chewy, and golden-brown, making it the perfect vessel for your favorite gyro fillings. Simple to make, and way better than store-bought!
Ingredients
- 3 cups all-purpose flour
- 1½ teaspoons active dry yeast
- 1½ teaspoons salt
- 1½ teaspoons sugar
- 1½ cups warm water
- 2 tablespoons olive oil
Instructions
The process starts with lukewarm water at 105°F (41°C). I mix it with yeast and sugar in a small bowl. The mixture needs to rest for 10-15 minutes until foam appears.
A large bowl works best to mix flour and salt. I add the yeast mixture and olive oil, then knead the dough for 8-10 minutes until it becomes smooth and elastic. The dough’s texture should feel tacky but manageable, and extra flour isn’t needed unless absolutely necessary.
The dough goes into a clean bowl to rise for 1-2 hours until it doubles in size. Once doubled, I divide it into 6-8 equal portions and shape them into balls.
These dough balls need a 30-minute rest. Each piece then gets rolled into a thin circle, about 7 inches (18cm) in diameter. Traditional Greek-style gyro bread requires fork pricks on the surface to prevent pockets from forming.
My stovetop method uses a cast iron skillet over medium-high heat. The bread cooks for 3-4 minutes on the first side until golden brown, and another minute on the second side. Bubbles will form, and that’s when I drizzle olive oil and flip every 30 seconds until deeply golden.
The oven method needs a 480°F (250°C) preheated pizza stone or baking tray. The bread bakes for 3-4 minutes and needs careful watching to prevent burning. Fresh from the heat, these breads get wrapped in a clean kitchen towel right away to stay soft.
Notes
My homemade gyro bread stays fresh with the right storage techniques. A ziplock bag at room temperature keeps leftover pieces good for up to 4 days. The flatbreads can last up to 3 months in the refrigerator if you place wax paper between each piece.
These proven methods work best to reheat the bread:
- Microwave: Wrap in damp paper towel, heat 10-20 seconds
- Air Fryer: Wrap in foil, heat at 380°F for 3-5 minutes
- Steam Skillet: Add water drops, cover and heat 10-15 seconds
- Open Flame: Hold briefly over gas flame to get a smoky flavor
The warm bread needs to sit in a plastic bag for one minute after reheating to spread moisture evenly. The dough’s consistency plays a crucial role – it should feel slightly tacky, not dry.
We measured ingredients by weight instead of volume to get consistent results. The dough’s hydration level needs careful monitoring since it affects the bread’s texture and puffing ability. The bread ended up too thick in my first attempts, so I adjusted my rolling technique to make thinner, more pliable pieces.
Extra batches freeze exceptionally well to prepare ahead. Parchment paper between pieces prevents them from sticking together in the freezer. This approach keeps the bread fresh for up to three months.
- Prep Time: 15 minutes
- Cook Time: 15 minutes
- Method: Baking
- Cuisine: Mediterranean
Nutrition
- Serving Size: 1 piece
- Calories: 150
- Sugar: 2 grams
- Sodium: 300 mg
FAQs
Gyro bread is thinner and more pliable than traditional pita bread, making it easier to wrap around fillings. This characteristic allows for better folding and a more convenient eating experience when making gyros or other wraps.
While pita is the traditional choice for gyros, you can use naan as an alternative. Both breads work well for wrapping gyro fillings, so the choice often comes down to personal preference or availability.
To achieve proper puffing, ensure your dough has the right moisture content and well-developed gluten. Knead the dough until it’s soft and stretchy, and avoid adding too much flour. Also, make sure your cooking surface is sufficiently hot before adding the bread.
Store gyro bread in an airtight container at room temperature for up to 2 days, or in the refrigerator for 3-4 days. For longer storage, freeze the cooled flatbreads with parchment paper between each piece to prevent sticking. Frozen gyro bread can last up to 3 months.
There are several effective methods to reheat gyro bread while maintaining its softness. You can wrap it in a damp paper towel and microwave for 10-20 seconds, wrap it in foil and heat in an air fryer at 380°F for 3-5 minutes, or briefly heat it over an open flame for a smoky flavor. After reheating, place the warm bread in a plastic bag for a minute to distribute moisture evenly.


