chocolate buttermilk pie
Here’s a surprising fact – chocolate buttermilk pie, a cherished Southern US tradition, traces its roots back to the United Kingdom.
This indulgent dessert captivates with its sugary crust and chocolate center that has won the hearts of many home bakers. The recipe boasts 47 five-star ratings from people who tried it at home. You’ll appreciate how quickly this pie comes together – just 15 minutes of prep time with basic ingredients from your pantry.
We’ll guide you through making this delicious creation. Picture a flaky crust filled with chocolate buttermilk custard and a rich chocolate ganache topping. The best part? You can make it ahead since it stays fresh up to 3 days in the fridge. This versatile pie works perfectly for special celebrations or as a weekend treat. Time to start baking!
Before You Get Starte:
A successful chocolate buttermilk pie starts with proper preparation. Take out all refrigerated ingredients and let them reach room temperature about 30 minutes before you begin. This step will give a smooth custard blend that bakes evenly.
Your workspace needs to be ready too. A clean counter with all equipment laid out makes the 15-minute prep time quick and enjoyable. Measure everything before you start – professional chefs call this “mise en place.” This method prevents mistakes and makes the whole baking process smoother.
The oven’s temperature accuracy is vital to get that perfect chocolate custard texture. Use an oven thermometer to verify the temperature stays steady while baking.
Line your pie dish with parchment paper if you want easier serving. It’s not required, but it helps a lot. Put a baking sheet on the bottom rack to catch any spills and keep your oven clean.
Take time to review the recipe completely before starting. You’ll know what’s coming next and can plan your time better. The actual prep won’t take long, but don’t forget to factor in cooling and setting time.
Key Tips:
Quality buttermilk makes a huge difference in your chocolate buttermilk pie’s taste. We used full-fat buttermilk to get the best results. You can mix 1/2 cup of heavy cream with low-fat buttermilk if full-fat isn’t available.
These temperature points are crucial to success:
- Ingredients must reach room temperature
- Eggs need 5 minutes in warm water
- Buttermilk requires 30-60 minutes on counter
- Microwave buttermilk in 15-second intervals if you’re short on time
A pre-baked crust creates a crispier base. Keep some pie dough scraps ready to fix any cracks during pre-baking. The custard needs careful attention while baking. The center should stay slightly jiggly as the edges set.
This pie’s storage qualities are impressive. It stays fresh in the refrigerator for up to 4 days. You can bake it 2 days ahead, cover it, and keep it in the fridge. Let the pie sit at room temperature for 10 minutes before serving.
The freezing process needs extra care. Refrigerate the pie for 2 hours first, then wrap it in double layers of plastic wrap and aluminum foil. Thaw it in the refrigerator overnight instead of room temperature. This helps maintain the custard’s smooth, creamy texture without breaking down.
What Makes This Recipe So Good?
This chocolate buttermilk pie delivers a perfect balance of flavors. Buttermilk’s creamy, tangy profile cuts through the sweetness and creates a harmonious blend with the rich chocolate. The buttermilk creates a distinctive custard-like texture that stays moist after chilling.
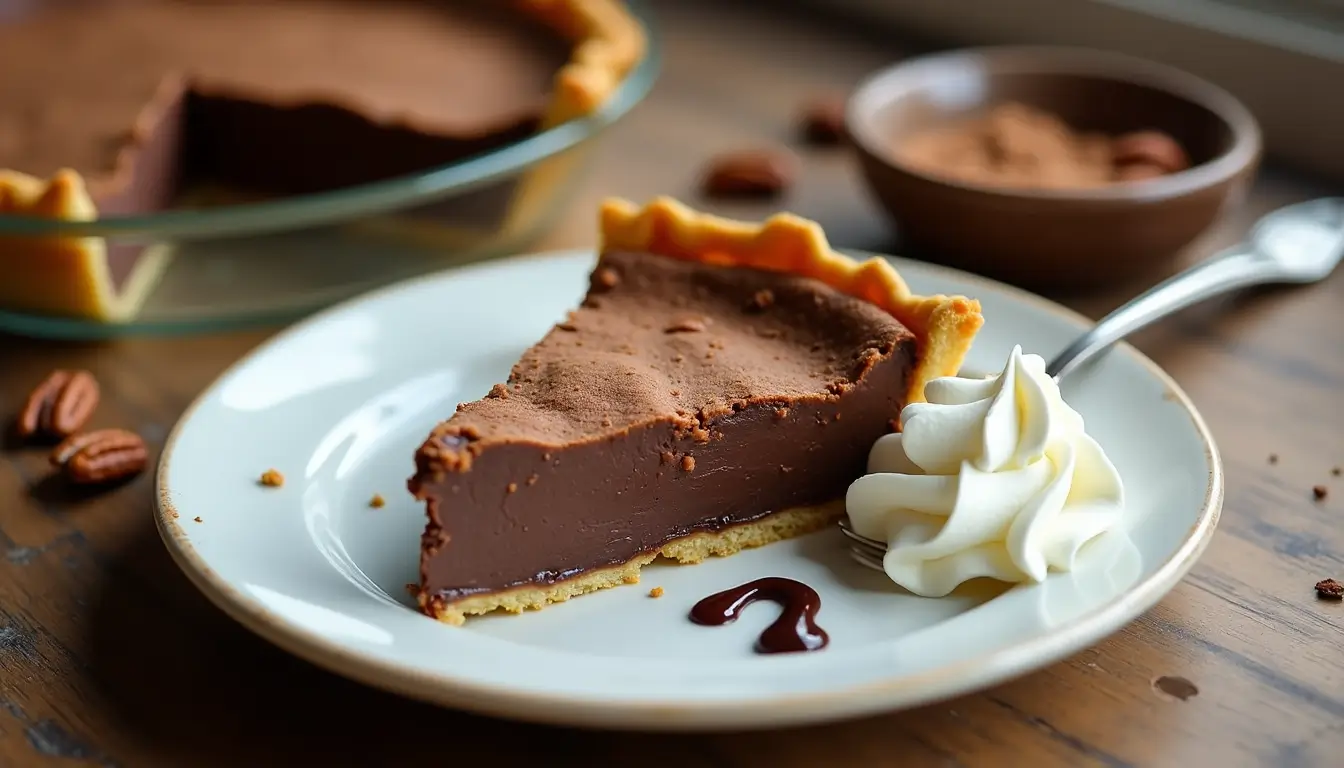
The pie’s deep chocolate flavor and smooth, custardy interior make it exceptional. A slightly crunchy, brownie-like crust develops on top while the center remains velvety. The flaky crust combines with the filling to create multiple texture layers that make every bite interesting.
You can serve this chocolate buttermilk pie at any occasion. It fits seamlessly on dessert tables and works great at tea parties. The flaky crust’s saltiness, chocolate’s bitterness, and filling’s sweetness create a complete tasting package.
The filling reminds you of an extra fudgy brownie that appeals to pie lovers and chocolate enthusiasts alike. Salted caramel pairs wonderfully with this pie and complements buttermilk’s tanginess and chocolate’s richness. A whipped cream dollop or vanilla ice cream scoop adds an extra dimension to this remarkable dessert.
Why I Love This Recipe:
Texas is where my love story with chocolate buttermilk pie started, right in Grandma Richey’s kitchen. This Southern classic quickly became my favorite recipe to make for Sunday suppers and family get-togethers. The deep chocolate flavor mixed with buttermilk’s subtle tang creates a taste you won’t forget.
This recipe amazes me with how well it works for everything – from a simple weeknight treat to special occasions. I can’t count how many times I’ve made it in my kitchen, and that chocolate smell filling the air always means something special is about to happen.
The pie’s texture is something special. It forms this delicate, brownie-like crust on top but stays silky-smooth inside. Every bite gives you the perfect mix of crunch and creaminess. Real buttermilk adds just enough tang to balance out the sweetness, and all the flavors work together beautifully.
I love how this recipe turns basic pantry ingredients into something amazing. It’s even better that I can make it whenever I have buttermilk left from making biscuits. The pie has earned its spot as a regular feature at our family’s Thanksgiving table.
This recipe means so much to me because it connects me to traditional Southern cooking. Every time I make it, memories of those warm Texas evenings at Grandma Richey’s table come flooding back – where we always ended our meals with something sweet and unforgettable.
Recipe Variations
Creative twists can reshape the scene of a classic chocolate buttermilk pie. We used almond flour or coconut flour to replace regular flour in the filling for gluten-free diets.
Heavy cream makes a richer chocolate caramel pie compared to buttermilk. This version needs 2 ounces of melted butter instead of 3 ounces. The chocolate flavor becomes more intense with cocoa powder.
Coffee enthusiasts will love adding espresso powder to their pies. A small amount highlights the chocolate notes, and more powder creates distinct coffee flavors.
The recipe opens up possibilities for exciting flavor combinations:
- Salted Butterscotch Pie
- Maple Pecan Pie
- Blackberry Buttermilk Pie
- Sweet Corn Buttermilk Pie
A caramel base creates depth and complexity in the traditional recipe. The pie becomes even more decadent with a whipped cream topping that turns it into a chocolate cream pie.
A pre-made pie crust saves time and effort. Note that frozen pies might weep slightly after thawing. The solution is to avoid overcooking the custard during baking.
Equipment
You’ll need the right equipment to make this delectable chocolate buttermilk pie, which will give a smooth baking process. We needed a suitable pie pan – either a standard 9-inch pie dish or a 10-inch tart pan with removable bottom.
These tools will help you get perfect results:
- A 4-quart mixing bowl with pour spout to transfer filling easily
- A handheld electric mixer to blend ingredients smoothly
- Pie weights or dried beans to pre-bake the crust
- An instant-read thermometer to check doneness
- A sturdy baking sheet to prevent spillage and ensure even baking
- Aluminum foil to protect the crust during pre-baking
I recommend keeping extra pie dough in your freezer for unexpected baking sessions. A cooling rack is a great way to get proper setting, and a dedicated pie server makes neat and precise portions.
Set up all equipment on a clean counter space before you start. The handheld mixer’s beaters can go straight into the dishwasher for easy cleanup. A tart pan with removable bottom makes serving especially straightforward as the sides lift away cleanly.
Proper storage extends these tools’ lifespan. Keep metal implements dry to prevent rusting, and stack pie pans carefully to avoid warping. Note that your instant-read thermometer needs regular calibration to stay accurate.
Ingredients
The perfect chocolate buttermilk pie starts with quality ingredients. Here’s everything you need:
For the Crust:
- 1¼ cups (156 g) all-purpose flour
- 1 tablespoon granulated sugar
- 1 teaspoon Diamond Crystal (or ½ teaspoon Morton) kosher salt
- ½ cup (1 stick) chilled unsalted butter, cut into ½-inch pieces
- ½ cup chilled buttermilk
For the Filling:
- 4 large eggs
- 1½ cups (300 g) granulated sugar
- 1 cup buttermilk
- ½ cup (1 stick) unsalted butter, melted and cooled
- 2 teaspoons vanilla extract
- ⅓ cup (39 g) Dutch-process cocoa powder (preferably Ghirardelli)
- ¼ cup (31 g) all-purpose flour
- ½ teaspoon Diamond Crystal (or ¼ teaspoon Morton) kosher salt
Dutch-process cocoa powder’s quality affects the pie’s taste by a lot. Ghirardelli brand gives the best results. Make sure your dairy products are fresh. Room temperature ingredients blend better, so take them out of the fridge ahead of time.
You can top the pie with some freshly whipped cream when serving. This recipe balances the buttermilk’s tang with rich chocolate flavors perfectly.
Instructions
Let’s tuck into making this delightful chocolate custard pie step by step.
Preparation:
The oven rack should sit in the bottom third of the oven at 375°F. You’ll need to whisk eggs and sugar in a large bowl until they’re really combined. Next, add buttermilk, melted butter, vanilla, cocoa powder, flour, and salt. Keep whisking until your mixture becomes perfectly smooth.
The pie dough needs to rest at room temperature to get the best results – about 5 minutes should do it. Roll it out on a lightly floured surface until you have a 12-inch diameter round. The dough should drape easily over your rolling pin as you transfer it to a 9-inch diameter pie dish. Press it gently into the dish and trim the dough, leaving about ½-inch overhang. The overhang should fold under while you crimp the edges however you like.
Cooking:
The prepared filling goes into your chilled crust. Bake it for 15 minutes at 375°F. We reduced the oven temperature to 350°F and kept baking until a tester came out clean from the center – this usually takes about 45 minutes.
The pie needs to cool completely on a wire rack. A serrated knife works best to get clean slices. You can make this pie 2 days ahead – just cover and refrigerate it. The pie should sit at room temperature for 10 minutes before serving to get that perfect texture.
Each slice tastes amazing with a dollop of freshly whipped cream on top. You can serve this pie slightly warm or chilled – it’s delicious either way.
Notes
Your chocolate buttermilk pie will maintain its delightful texture and flavor with proper storage. The pie stays fresh in the refrigerator for up to 4 days. Let it reach room temperature before serving to get the best consistency.
The pie freezes well and can last up to 2 months, but the taste and consistency might change slightly after thawing. Double-wrap the pie in plastic wrap and aluminum foil for freezer storage. Thaw it overnight in the refrigerator, not at room temperature.
A dollop of whipped cream boosts the presentation among shaved chocolate or fresh strawberries with mint. The pie’s versatility shines with different toppings – vanilla ice cream, salted caramel, or a sprinkle of mini chocolate chips create delightful variations.
Need a quick buttermilk substitute? Mix one cup of milk with ½ tablespoon of vinegar or lemon juice. This homemade version matches store-bought buttermilk’s taste and texture.
Natural unsweetened cocoa powder creates a richer, bolder chocolate flavor than Dutch-processed varieties. The pie’s center should have a slight jiggle while the edges set to prevent custard separation. You can make this recipe gluten-free by using almond or coconut flour instead of all-purpose flour in the filling.
Chocolate Buttermilk Pie
Equipment
- A 4-quart mixing bowl with pour spout to transfer filling easily
- A handheld electric mixer to blend ingredients smoothly
- Pie weights or dried beans to pre-bake the crust
- An instant-read thermometer to check doneness
- A sturdy baking sheet to prevent spillage and ensure even baking
- Aluminum foil to protect the crust during pre-baking
Ingredients
For the Crust:
- 1¼ cups 156 g all-purpose flour
- 1 tablespoon granulated sugar
- 1 teaspoon Diamond Crystal or ½ teaspoon Morton kosher salt
- ½ cup 1 stick chilled unsalted butter, cut into ½-inch pieces
- ½ cup chilled buttermilk
For the Filling:
- 4 large eggs
- 1½ cups 300 g granulated sugar
- 1 cup buttermilk
- ½ cup 1 stick unsalted butter, melted and cooled
- 2 teaspoons vanilla extract
- ⅓ cup 39 g Dutch-process cocoa powder (preferably Ghirardelli)
- ¼ cup 31 g all-purpose flour
- ½ teaspoon Diamond Crystal or ¼ teaspoon Morton kosher salt
Instructions
- Let’s tuck into making this delightful chocolate custard pie step by step.Preparation:The oven rack should sit in the bottom third of the oven at 375°F. You’ll need to whisk eggs and sugar in a large bowl until they’re really combined. Next, add buttermilk, melted butter, vanilla, cocoa powder, flour, and salt. Keep whisking until your mixture becomes perfectly smooth.The pie dough needs to rest at room temperature to get the best results – about 5 minutes should do it. Roll it out on a lightly floured surface until you have a 12-inch diameter round. The dough should drape easily over your rolling pin as you transfer it to a 9-inch diameter pie dish. Press it gently into the dish and trim the dough, leaving about ½-inch overhang. The overhang should fold under while you crimp the edges however you like.Cooking:The prepared filling goes into your chilled crust. Bake it for 15 minutes at 375°F. We reduced the oven temperature to 350°F and kept baking until a tester came out clean from the center – this usually takes about 45 minutes.The pie needs to cool completely on a wire rack. A serrated knife works best to get clean slices. You can make this pie 2 days ahead – just cover and refrigerate it. The pie should sit at room temperature for 10 minutes before serving to get that perfect texture.Each slice tastes amazing with a dollop of freshly whipped cream on top. You can serve this pie slightly warm or chilled – it’s delicious either way.
Notes
FAQs
To ensure your pie sets properly, bake it until the edges are set but the center still has a slight jiggle. Use an instant-read thermometer to check that the internal temperature reaches about 200°F (93°C). Also, allow the pie to cool completely before slicing.
The unique flavor of chocolate buttermilk pie comes from the combination of rich chocolate and tangy buttermilk. The buttermilk adds a subtle tang that balances the sweetness, while high-quality Dutch-process cocoa powder provides a deep chocolate flavor.
You can store chocolate buttermilk pie in the refrigerator for up to 4 days. For longer storage, you can freeze it for up to 2 months. When freezing, wrap the pie tightly in plastic wrap and aluminum foil to prevent freezer burn.
Yes, you can make chocolate buttermilk pie ahead of time. It can be prepared up to 2 days in advance. After baking, allow it to cool completely, then cover and refrigerate. Before serving, let it sit at room temperature for about 10 minutes.
Chocolate buttermilk pie is delicious on its own, but you can enhance it with various toppings. Try serving it with a dollop of freshly whipped cream, a scoop of vanilla ice cream, or a drizzle of salted caramel sauce. For added texture, sprinkle some mini chocolate chips or shaved chocolate on top.


